Tuesday 26 May 2020
Efficient Accident Vehicle Detection and Notification System Based on Ra...
Efficient Accident Vehicle Detection and Notification System Based on Raspberry Pi 3
Monday 25 May 2020
ESP32 Home Automation Using in Built Bluetooth
Watch Video Demonstration Carefully Till End -- ESP32 Home Automation Using in Built Bluetooth |Control Home Appliance Using ESP32 BLE + Android App
ESP32 Home Automation Using in Built Bluetooth |Control Home Appliance Using ESP32 BLE + Android App
PLEASE SUBSCRIBE FOR MORE PROJECT VIDEOS --► HTTP://BIT.LY/29VPRS9
SCHEMATIC DIAGRAM:

FINAL SOFTWARE CODE:
#include "BluetoothSerial.h"
//////////////////////////////////////////////////////////////////////////////
#if !defined(CONFIG_BT_ENABLED) || !defined(CONFIG_BLUEDROID_ENABLED)
#error Bluetooth is not enabled! Please run `make menuconfig` to and enable it
#endif
///////////////////////////////////////////////////////////////////
String res = "";
///////////////////////////////////////////////////////////////////
BluetoothSerial SerialBT;
///////////////////////////////////////////////////////////////////
void setup()
{
Serial.begin(115200);
pinMode(12, OUTPUT);
pinMode(13, OUTPUT);
pinMode(14, OUTPUT);
pinMode(27,OUTPUT);
SerialBT.begin("ESP32test"); //Bluetooth device name
Serial.println("The device started, now you can pair it with bluetooth!");
}
void loop()
{
while (!SerialBT.available());
while (SerialBT.available())
{
char add = SerialBT.read();
res = res + add;
delay(1);
}
///////////////////////////////////////////////////////////////////
// Assigning Actions on particular conditions
if (res == "T")
{
Serial.println("Connection Established!!!");
}
///////////////////////////////////////////////////////////////////
if (res == "1")
{
Serial.println("Turning ON 1st led");
digitalWrite(12, LOW);
}
///////////////////////////////////////////////////////////////////
if (res == "A")
{
Serial.println("Turning OFF 1st led");
digitalWrite(12,HIGH);
}
///////////////////////////////////////////////////////////////////
if (res == "2")
{
Serial.println("Turning ON 2nd led");
digitalWrite(14, LOW);
}
///////////////////////////////////////////////////////////////////
if (res == "B")
{
Serial.println("Turning OFF 2nd led");
digitalWrite(14,HIGH);
}
///////////////////////////////////////////////////////////////////
if (res == "3")
{
Serial.println("Turning ON 3rd led");
digitalWrite(27,LOW);
}
///////////////////////////////////////////////////////////////////
if (res == "C")
{
Serial.println("Turning OFF 3rd led");
digitalWrite(27, HIGH);
}
///////////////////////////////////////////////////////////////////
if (res == "4")
{
Serial.println("Turning ON 4th led");
digitalWrite(13, LOW);
}
///////////////////////////////////////////////////////////////////
if (res == "D")
{
Serial.println("Turning OFF 4th led");
digitalWrite(13,HIGH);
}
///////////////////////////////////////////////////////////////////
if (res == "9")
{
Serial.println("Turning ON all led");
digitalWrite(12, LOW);
digitalWrite(13, LOW);
digitalWrite(14, LOW);
digitalWrite(27, LOW);
}
///////////////////////////////////////////////////////////////////
if (res == "I")
{
Serial.println("Turning OFF all led");
digitalWrite(12, HIGH);
digitalWrite(13, HIGH);
digitalWrite(14, HIGH);
digitalWrite(27, HIGH);
}
///////////////////////////////////////////////////////////////////
res = ""; // clearing the string.
}
/////////////////////////////////////////////////////////////////////////////////////////////////////////////////////////
================================================================
PROJECT KIT HELP AND EXECUTION PROCESS
SVSEMBEDDED - 9491535690 / 7842358459
Project help & learning - Online Support
· You can build this project at home. With step by step process Explain on video call and remote desktop command line console
· Team Viewer: The Remote Desktop Software
· Any Desk: The Fast Remote Desktop Application Software.
· We will charge the Money depends on the project worth.
· We will write the code on your Computer with Remote Desktop connection and Compile the code in your computer only Dumping the code to u r computer
· Online embedded project kit support.
· Indian timings 10:00am to 6:00pm. (WhatsApp / Google Duo video and voice calls)
· You can build this project support in case of any doubts- online YouTube tutorials.
· We can develop the Project with your own ideas also.
Saturday 23 May 2020
Tuesday 19 May 2020
Remote Patient Monitoring: Wearable Healthcare Devices Through IoT with ...
Remote Patient Monitoring: Wearable Healthcare Devices Through IoT with Remote Patients
Monday 18 May 2020
WiFi Based DC Motor Speed and Direction Control using NodeMCU
Watch Video Demonstration Carefully Till End -- WiFi Based DC Motor Speed and Direction Control using NodeMCU
PLEASE SUBSCRIBE FOR MORE PROJECT VIDEOS --► HTTP://BIT.LY/29VPRS9
Project Abstract and Block Diagram Link► https://www.svsembedded.com/WiFi_Based_DC_Motor_Speed_and_Direction_Control_using_NodeMCU.php
SCHEMATIC DIAGRAM:

FINAL SOFTWARE CODE:
#include <ESP8266WiFi.h>
const char* ssid = "abcd";
const char* password = "123456";
uint8_t Pwm1 = D1; //Nodemcu PWM pin
uint8_t Pwm2 = D2; //Nodemcu PWM pin
//Seven segment pins attachecd with nodemcu pins
int a0 = 15; //Gpio-15 of nodemcu esp8266
int a1 = 13; //Gpio-13 of nodemcu esp8266
int a2 = 12; //Gpio-12 of nodemcu esp8266
int a3 = 14; //Gpio-14 of nodemcu esp8266
WiFiServer server(80);
void setup() {
Serial.begin(115200);
delay(10);
//Declaring l293d control pins as Output
pinMode(a0, OUTPUT);
pinMode(a1, OUTPUT);
pinMode(a2, OUTPUT);
pinMode(a3, OUTPUT);
// Connect to WiFi network
Serial.println();
Serial.println();
Serial.print("Connecting to ");
Serial.println(ssid);
WiFi.begin(ssid, password);
while (WiFi.status() != WL_CONNECTED) {
delay(500);
Serial.print(".");
}
Serial.println("");
Serial.println("WiFi connected");
// Start the server
server.begin();
Serial.println("Server started");
// Print the IP address on serial monitor
Serial.print("Use this URL to connect: ");
Serial.print("http://"); //URL IP to be typed in mobile/desktop browser
Serial.print(WiFi.localIP());
Serial.println("/");
}
void loop() {
// Check if a client has connected
WiFiClient client = server.available();
if (!client) {
return;
}
// Wait until the client sends some data
Serial.println("new client");
while(!client.available()){
delay(1);
}
// Read the first line of the request
String request = client.readStringUntil('\r');
Serial.println(request);
client.flush();
int Ms=0,dir=0,Pw=0;
// Match the request
if (request.indexOf("/start=1") != -1) {
digitalWrite(a0, HIGH); //Start first motor
digitalWrite(a1, LOW);
digitalWrite(a2, HIGH); //Start second motor
digitalWrite(a3, LOW);
Ms=1;
dir=1;
}
if (request.indexOf("/stop=1") != -1) {
digitalWrite(a0, LOW); //Stop first motor
digitalWrite(a1, LOW);
digitalWrite(a2, LOW); //Stop second motor
digitalWrite(a3, LOW);
Ms=0;
}
if (request.indexOf("/tog=1") != -1) {
digitalWrite(a0, LOW); //Change First motor rotation direction
delay(5000); //5 seconds delay
digitalWrite(a1, HIGH);
digitalWrite(a2, LOW); //Change Second motor rotation direction
delay(5000); //5 seconds delay
digitalWrite(a3, HIGH);
dir=0;
}
if (request.indexOf("/Req=2") != -1) {
analogWrite(Pwm1, 767); //Pwm duty cycle 75%
analogWrite(Pwm2, 767); //Pwm duty cycle 75%
Pw=1;
}
if (request.indexOf("/Req=3") != -1) {
analogWrite(Pwm1, 512); //Pwm duty cycle 50%
analogWrite(Pwm2, 512); //Pwm duty cycle 50%
Pw=2;
}
if (request.indexOf("/Req=4") != -1) {
analogWrite(Pwm1, 255); //Pwm duty cycle 25%
analogWrite(Pwm2, 255); //Pwm duty cycle 25%
Pw=3;
}
// Return the response
client.println("HTTP/1.1 200 OK");
client.println("Content-Type: text/html");
client.println(""); // do not forget this one
client.println("<!DOCTYPE HTML>");
client.println("<html>");
client.println("<h1 align=center>Nodemcu Dc motor control over WiFi</h1><br><br>");
client.println("<br><br>");
client.println("<a href=\"/start=1\"\"><button>Start Motor </button></a><br/>");
client.println("<a href=\"/stop=1\"\"><button>Stop Motor </button></a><br/>");
client.println("<a href=\"/tog=1\"\"><button>Toggle Direction</button></a><br/>");
client.println("<a href=\"/Req=2\"\"><button>Duty cycle 75% </button></a><br/>");
client.println("<a href=\"/Req=3\"\"><button>Duty cycle 50% </button></a><br/>");
client.println("<a href=\"/Req=4\"\"><button>Duty cycle 25% </button></a><br/>");
if(Ms==1){
client.println("Motor Powered Working<br/>" );
}
else
client.println("Motor at Halt<br/>" );
if(dir==1){
client.println("Motor rotating in forward direction<br/>" );
}
else
client.println("Motor rotating in backward direction<br/>" );
switch(Pw){
case 1:
client.println("Pwm duty cycle 75%<br/>" );
break;
case 2:
client.println("Pwm duty cycle 50%<br/>" );
break;
case 3:
client.println("Pwm duty cycle 25%<br/>" );
break;
default:
client.println("Pwm duty cycle 100%<br/>" );
}
client.println("</html>");
delay(1);
Serial.println("Client disonnected");
Serial.println("");
}
/////////////////////////////////////////////////////////////////////////////////////////////////////////////////////////
================================================================
PROJECT KIT HELP AND EXECUTION PROCESS
SVSEMBEDDED - 9491535690 / 7842358459
Project help & learning - Online Support
· You can build this project at home. With step by step process Explain on video call and remote desktop command line console
· Team Viewer: The Remote Desktop Software
· Any Desk: The Fast Remote Desktop Application Software.
· We will charge the Money depends on the project worth.
· We will write the code on your Computer with Remote Desktop connection and Compile the code in your computer only Dumping the code to u r computer
· Online embedded project kit support.
· Indian timings 10:00am to 6:00pm. (WhatsApp / Google Duo video and voice calls)
· You can build this project support in case of any doubts- online YouTube tutorials.
· We can develop the Project with your own ideas also.
Saturday 16 May 2020
How do I change the default COM port setting for Device Manager
SOLUTION
- Go to Windows Device manager > Multi-port serial adapters.

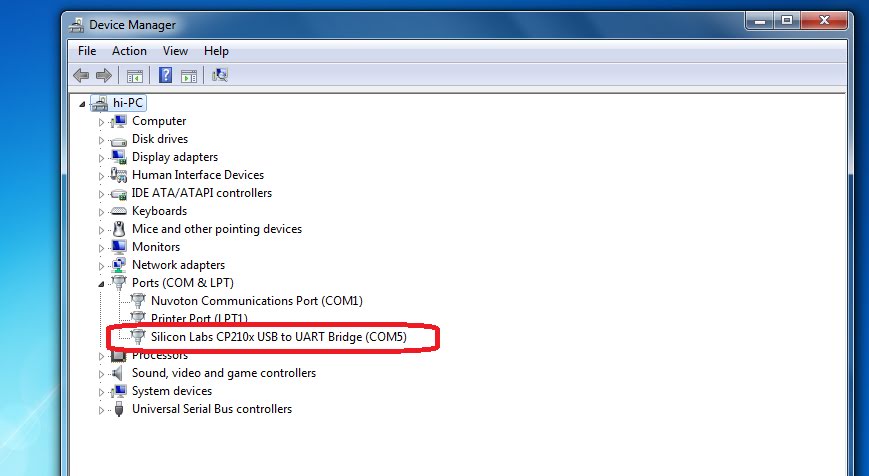
- Select the adapter and right click to open the menu.
- Click on the Properties link.
- Open the Ports Configuration tab.
- Click on the Port Setting button.
- Select the Port Number and click OK.
- Click OK to apply the changes
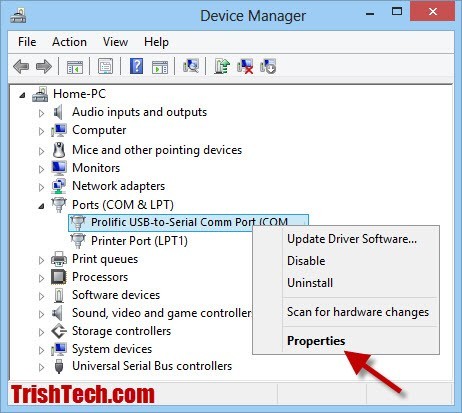
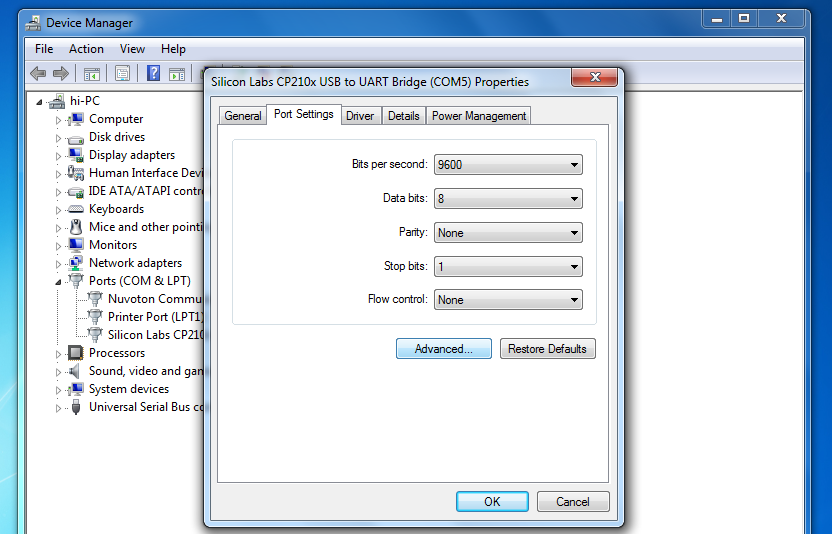


then press ok and restart computer then comes on
Subscribe to:
Posts (Atom)

-
Watch Video Demonstration Carefully Till End -- Temperature and Humidity Controller For Incubator Temperature and Humidity Controller For ...
-
 www.svsembedded.com SVSEMBEDDED svsembedded@gmail.com , CONTACT: 9491535690, 7842358459 ------------------------------------------...
 -
Interfacing of Multiple Ultrasonic Sensors (3 HC-SR04 ) With Arduino Please Subscribe For More Project Videos --► http://bit.ly/29vPr...

